Introduction
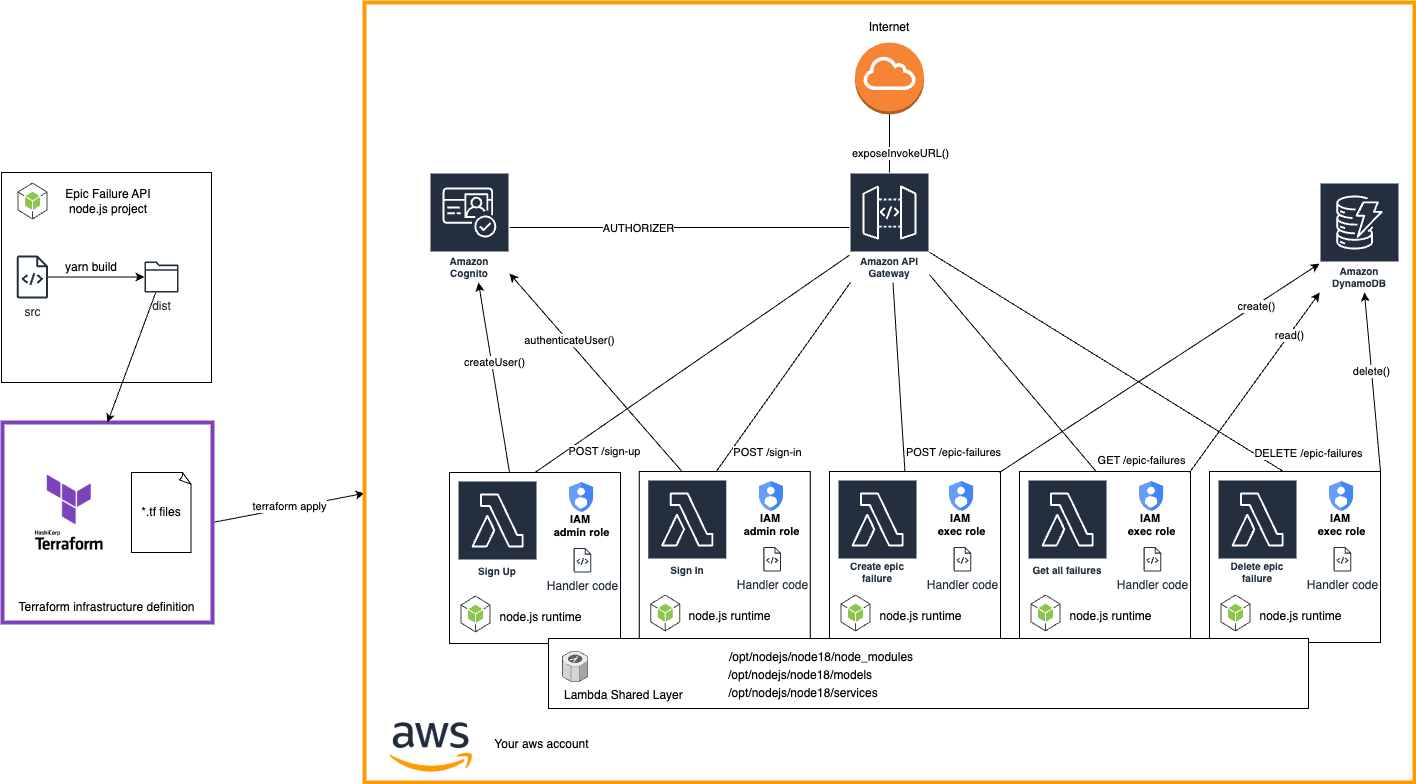
We’ve created a hands-on tutorial to guide you through deploying a Node.js REST API with CRUD endpoints using Terraform. This setup incorporates AWS Cognito for authentication, DynamoDB for storage, and shared layers to optimize Lambda function builds and deployments.
In this tutorial, you’ll learn to deploy an API that manages “epic failures” - a whimsical term we’re using for noteworthy blunders, slip-ups, or moments of learning from failure. Think of it as a digital notebook for storing and retrieving your most memorable mistakes (or those of others). We are going to set up HTTP methods for sign-up, sign-in, creating, retrieving, and deleting these "epic failures."
This is the first part of a series of tutorials that will help you build a solid foundation in serverless development with Terraform and will provide you with a fully operational backend to play with.
The Serverless Concept
Serverless is a development paradigm that eliminates the need for developers to manage underlying servers. Instead of provisioning and maintaining infrastructure, we focus solely on writing code, while cloud providers handle scaling, availability, and infrastructure management. AWS Lambda is one of the key services that implements this serverless concept. It allows us to run code in response to events without worrying about server maintenance. This approach is particularly advantageous for APIs, as it supports rapid scaling, reduces operational overhead, and follows a pay-as-you-go model, ensuring cost-efficiency for workloads of varying demand.
Terraform in a Nutshell
Terraform is an open-source tool that allows us to define and provision infrastructure using a high-level configuration language. Unlike manual setup, Terraform makes it easy to create reusable, maintainable configurations for your projects, which saves time and effort.
If you have previous experiences with Serverless Framework, Terraform can not only match in functionality but shines when it comes to flexibility and reusability across your infrastructure.
Set up your development environment
Before deploying this project, ensure that you have the following tools installed and configured on your machine:
Node.js and npm
Download and install Node.js (npm is included in the Node.js installation).
Verify the installation by running:
node -v
npm -v
yarn
Yarn is a popular alternative to npm for managing dependencies. Follow the installation guide for Yarn. Verify the installation with:
yarn -vTerraform CLI
Terraform is required to deploy AWS resources. Download and install Terraform following the installation guide.
Check if Terraform is correctly installed by running:
terraform -vAWS Account
You will need an AWS account with the AWS CLI properly configured on your machine to deploy resources. Create an AWS account if you don't have one. After creating your account, install the AWS CLI: AWS CLI installation guide. Then configure it by running:
aws configure
Once you have these prerequisites in place, you’ll be ready to proceed with the project setup and deployment.
Part 1: Deploy your first serverless method using Terraform
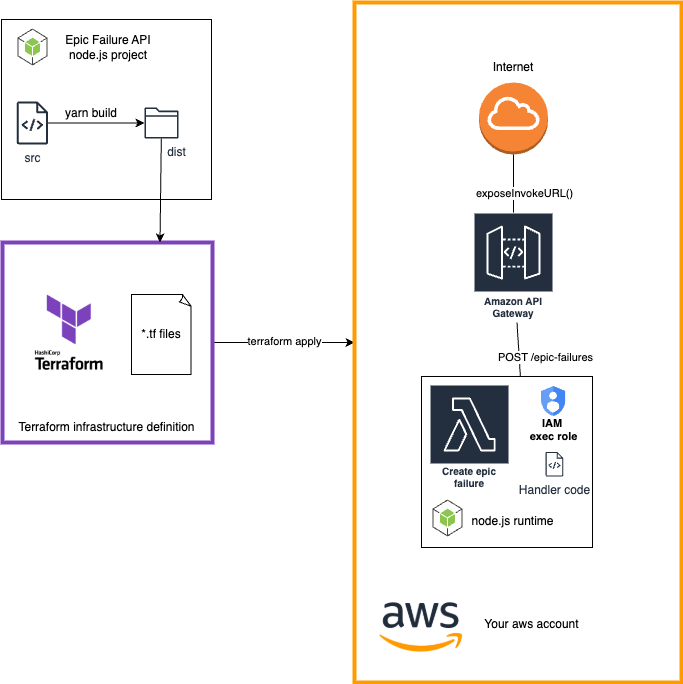
Let's start simple. No authentication, no database, just a simple Lambda function that returns a message. This will help you understand the basic structure of a serverless project and how to deploy it using Terraform.
First, clone the project repository from GitHub. Open a terminal and run:
git clone https://github.com/move2edge/blog-serverless-api-using-terraform.git
Please navigate to the 101 directory:
cd blog-serverless-api-using-terraform/101
In the root directory you will find two main folders:
- terraform: Contains the Terraform configuration files for deploying the API on AWS.
- epicfailure-api: Contains the Node.js application code for the serverless API.
Understanding the Node.js application
The code is structured as follows:
epicfailure-api
├── src
│   ├── handlers
│   │   └── create-epic-failure-handler.ts
│   └── models
│       └── EpicFailure.ts
├── build-handlers.js
├── eslint.config.mjs
├── package.json
├── tsconfig.json
└── yarn.lock
Let's take a look at the create-epic-failure-handler.ts file:
// epicfailure-api/src/handlers/create-epic-failure-handler.ts

// This file defines the AWS Lambda handler for a dummy epic failure creation.
// It validates the request body against a schema and creates an epic failure object.

import { APIGatewayProxyEvent, APIGatewayProxyResult } from 'aws-lambda';
import EpicFailure, { IEpicFailure } from '../models/EpicFailure';
import * as Joi from 'joi';

const epicFailureSchema = Joi.object<IEpicFailure>({
  failureID: Joi.string().required(),
  taskAttempted: Joi.string().required(),
  whyItFailed: Joi.string().required(),
  lessonsLearned: Joi.array().items(Joi.string()).required(),
});

const createEpicFailureHandler = async (event: APIGatewayProxyEvent): Promise<APIGatewayProxyResult> => {
  console.log('Event: ', event);

  // Parse the request body
  const requestBody = JSON.parse(event.body || '{}');

  // Validate the request body against the schema
  const { error, value } = epicFailureSchema.validate(requestBody);
  if (error) {
    return {
      statusCode: 400,
      body: JSON.stringify({ message: 'Invalid request body', error: error.details[0].message }),
    };
  }

  const { failureID, taskAttempted, whyItFailed, lessonsLearned } = value as IEpicFailure;

  const epicFailure = new EpicFailure(failureID, taskAttempted, whyItFailed, lessonsLearned);

  console.log('Creating epic failure:', epicFailure);
  return {
    statusCode: 201,
    body: JSON.stringify({ message: 'Epic failure created successfully', epicFailure }),
  };
};

exports.handler = createEpicFailureHandler;
As you can see we are using Joi - external npm library to validate the request body. The EpicFailure class and its interface is defined in the models/EpicFailure.ts file. After validation of the request body, the handler creates an EpicFailure object, prints it and returns a message stating that the failure record is created (however not persisted anywhere yet).
Bundling the TypeScript code and building the project
To execute the Lambda, the handler needs access not only to its own code but also to all imports from other project files and external dependencies. In this first part of the tutorial, we’ll focus on building the project by bundling the TypeScript code into a single JavaScript file. Since we’re working with just one Lambda function for now, there’s no need to worry about shared layers or deployment optimizations.
build-handlers.js is a script that uses esbuild to compile the TypeScript code into JavaScript.
// epicfailure-api/sbuild-handlers.js
// This script uses esbuild to bundle each handler along with its dependencies into a single file.
// It reads the handlers directory, filters out unnecessary files, and bundles each handler into the dist directory.

const fs = require('fs');
const path = require('path');
const esbuild = require('esbuild');

const handlersDir = path.join(__dirname, 'src', 'handlers');
const outputDir = path.join(__dirname, 'dist', 'handlers');

if (!fs.existsSync(outputDir)) {
  fs.mkdirSync(outputDir, { recursive: true });
}

fs.readdir(handlersDir, (err, files) => {
  if (err) {
    console.error('Error reading handlers directory:', err);
    process.exit(1);
  }

  files = files.filter(file => file !== '.DS_Store'); // Ignore .DS_Store files (macOS)

  files.forEach(file => {
      const outfilename = file.replace('.ts', '.js');

      esbuild.build({
        entryPoints: [path.join(handlersDir, file)],
        bundle: true,
        outfile: path.join('dist', 'handlers', outfilename),
        external: ['aws-sdk'], // Exclude AWS SDK since it's available in the Lambda runtime
        platform: 'node',
        target: 'node18',
      }).catch(() => process.exit(1));
  });
});
Install the project dependencies by running:
yarn install
Let's build the project. Run the following command:
yarn build
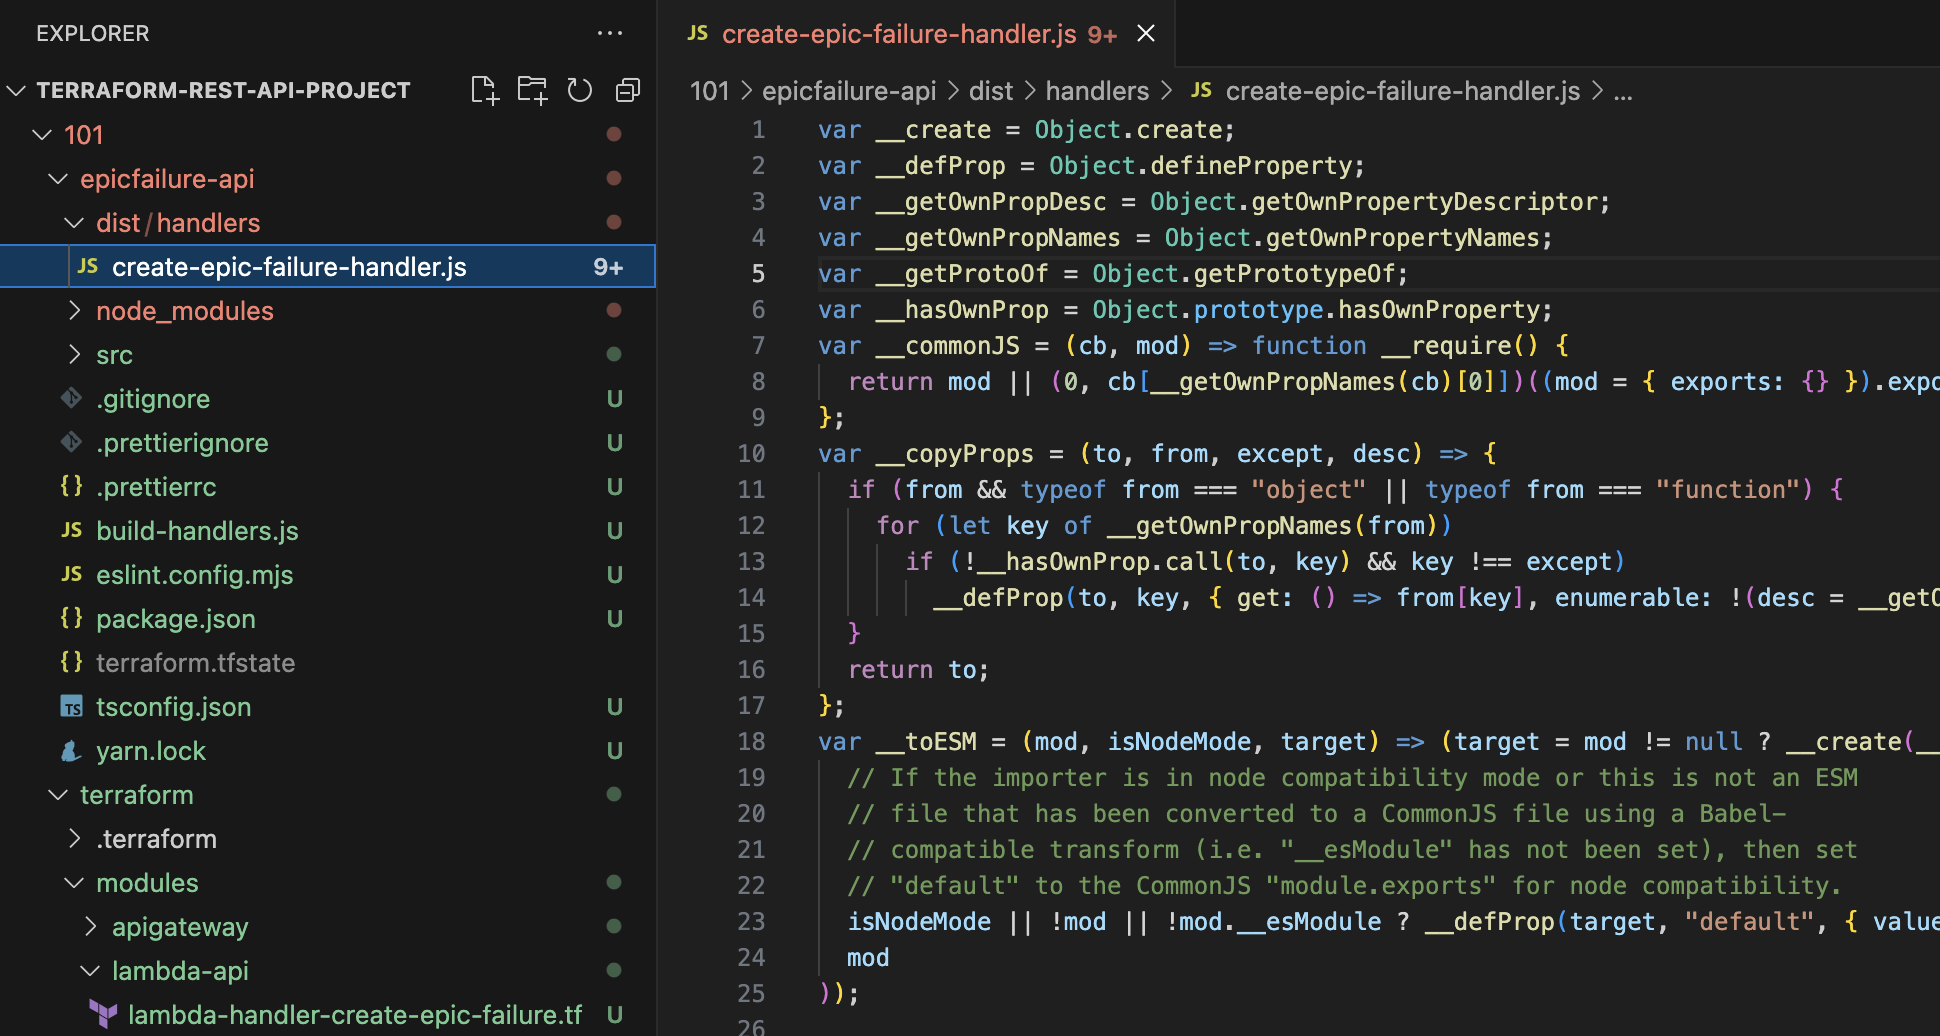
This should create a dist directory with the compiled JavaScript handler file with all the dependencies bundled.
Understanding the Terraform configuration
The terraform folder has all the config files for deploying this serverless API on AWS:
terraform
├── modules
│   ├── apigateway
│   │   ├── main.tf
│   │   ├── outputs.tf
│   │   └── variables.tf
│   └── lambda-api
│       ├── lambda-handler-create-epic-failure.tf
│       ├── main.tf
│       └── variables.tf
├── main.tf
├── outputs.tf
├── terraform.tf
└── variables.tf
The root main.tf sets up modules we'll need: API Gateway module and Lambda Api module. In the variables.tf file, we define the variables that will be used in the modules. The outputs.tf file defines the output variables that will be displayed after the terraform apply command.
Modules are reusable, which really comes in handy if you’re looking to set up different environments or customize the infrastructure for specific deployments.
Setting up the API Gateway
To expose our Lambda function to the internet, we need to create an API Gateway. The apigateway module is responsible for that.
# terraform/modules/apigateway/main.tf

# This Terraform configuration defines the following AWS resources:
# 1. API Gateway (aws_apigatewayv2_api): Creates an HTTP API Gateway with the specified name.
# 2. API Gateway Stage (aws_apigatewayv2_stage): Creates a deployment stage for the API Gateway
#    with auto-deploy enabled and access logging configured to CloudWatch.
# 3. CloudWatch Log Group (aws_cloudwatch_log_group): Creates a CloudWatch Log Group for storing
#    API Gateway access logs with a retention period of 14 days.

resource "aws_apigatewayv2_api" "api_gateway" {
  name          = var.api_gateway_name
  protocol_type = "HTTP"
}

resource "aws_apigatewayv2_stage" "stage" {
  api_id = aws_apigatewayv2_api.api_gateway.id
  name        = var.api_gateway_stage_name
  auto_deploy = true

  access_log_settings {
    destination_arn = aws_cloudwatch_log_group.cloudwatch.arn
    format = jsonencode({
      requestId      = "$context.requestId"
      sourceIp       = "$context.identity.sourceIp"
      requestTime    = "$context.requestTime"
      httpMethod     = "$context.httpMethod"
      resourcePath   = "$context.resourcePath"
      status         = "$context.status"
      responseLength = "$context.responseLength"
    })
  }
}

resource "aws_cloudwatch_log_group" "cloudwatch" {
  name = "/aws/api-gw/${aws_apigatewayv2_api.api_gateway.name}"
  retention_in_days = 14
}
Setting up the Lambda function
Having Api Gateway in place, we need to create a Lambda function that will handle the API requests. The lambda-api module is responsible for that.
Let's start with the main.tf file. We need a bucket where the code of the handler will be uploaded by the Terraform. We also need an IAM role for the Lambda function to execute.
# terraform/modules/lambda-api/main.tf

# This Terraform configuration defines the following AWS resources:

# 1. Data Source for AWS Account Information (data "aws_caller_identity"): Retrieves
#    information about the current AWS account.
# 2. S3 Bucket (aws_s3_bucket): Creates an S3 bucket for storing Lambda functions.
# 3. S3 Bucket Public Access Block (aws_s3_bucket_public_access_block): This configuration
#    ensures that the S3 bucket lambda_bucket is not publicly accessible by blocking various
#    types of public access settings.
# 4. IAM Role for Lambda Execution (aws_iam_role): Creates an IAM role for Lambda execution
#    with the necessary assume role policy.
# 5. IAM Role Policy Attachment (aws_iam_role_policy_attachment): Attaches the
#    AWSLambdaBasicExecutionRole policy to the IAM role.

# Data source for AWS account information
data "aws_caller_identity" "current" {}


# S3 Bucket for Lambda functions
resource "aws_s3_bucket" "lambda_bucket" {
  bucket        = "${var.lambda_function_name_prefix}-lambda-bucket"
  force_destroy = true
}

resource "aws_s3_bucket_public_access_block" "lambda_bucket" {
  bucket = aws_s3_bucket.lambda_bucket.id
  block_public_acls       = true
  block_public_policy     = true
  ignore_public_acls      = true
  restrict_public_buckets = true
}

# IAM Role for Lambda execution
resource "aws_iam_role" "lambda_role_exec" {
  name = "exec-lambda"
   assume_role_policy = jsonencode({
    Version = "2012-10-17"
    Statement = [
      {
        Effect = "Allow"
        Principal = {
          Service = "lambda.amazonaws.com"
        }
        Action = "sts:AssumeRole"
      }
    ]
  })
}

resource "aws_iam_role_policy_attachment" "lambda_policy" {
  role       = aws_iam_role.lambda_role_exec.name
  policy_arn = "arn:aws:iam::aws:policy/service-role/AWSLambdaBasicExecutionRole"
}
Now we can define the Lambda function itself. We need to upload the code of the handler to the S3 bucket and create the Lambda function. We define the handler, runtime, and the IAM role for the Lambda function. We are using archive_file data source to zip the handler code from the dist directory of the node.js application. The lambda is attached to the API Gateway using the aws_apigatewayv2_integration resource. We define the route for the Lambda function in the API Gateway using the aws_apigatewayv2_route resource.
# terraform/modules/lambda-api/lambda-handler-create-epic-failure.tf

# This Terraform configuration defines the following AWS resources:
# 1. Lambda Function for Creating an Epic Failure (aws_lambda_function):
#    Creates a Lambda function for creating a failure.
# 2. Data Source for Create Epic Failure Lambda Code (data "archive_file"):
#    Archives the create-epic-failure Lambda function code into a zip file.
# 3. API Gateway Integration for Create Epic Failure Lambda (aws_apigatewayv2_integration):
#    Creates an integration between API Gateway and the create-epic-failure Lambda function.
# 4. API Gateway Route for Create Epic Failure (aws_apigatewayv2_route): Creates
#    a route in API Gateway for the create-epic-failure endpoint.
# 5. Lambda Permission for API Gateway (aws_lambda_permission): Grants API Gateway
#    permission to invoke the create-epic-failure Lambda function.

resource "aws_lambda_function" "lambda_create_epic_failure" {
  function_name    = "${var.lambda_function_name_prefix}-create-epic-failure"
  runtime          = "nodejs18.x"
  handler          = "create-epic-failure-handler.handler"
  role             = aws_iam_role.lambda_role_exec.arn
  filename         = data.archive_file.create_epic_failure_lambda_zip.output_path
  source_code_hash = data.archive_file.create_epic_failure_lambda_zip.output_base64sha256
}

data "archive_file" "create_epic_failure_lambda_zip" {
  type        = "zip"
  source_file = "${path.module}/../../../epicfailure-api/dist/handlers/create-epic-failure-handler.js"
  output_path = "${path.module}/../../../epicfailure-api/dist/createEpicFailure.zip"
}

resource "aws_apigatewayv2_integration" "lambda_create_epic_failure" {
  api_id             = var.api_gateway_id
  integration_uri    = aws_lambda_function.lambda_create_epic_failure.invoke_arn
  integration_type   = "AWS_PROXY"
  integration_method = "POST"
}

resource "aws_apigatewayv2_route" "post_create_epic_failure" {
  api_id    = var.api_gateway_id
  route_key = "POST /epic-failures"
  target    = "integrations/${aws_apigatewayv2_integration.lambda_create_epic_failure.id}"
}

resource "aws_lambda_permission" "api_gw_create_epic_failure" {
  statement_id  = "AllowExecutionFromAPIGateway"
  action        = "lambda:InvokeFunction"
  function_name = aws_lambda_function.lambda_create_epic_failure.function_name
  principal     = "apigateway.amazonaws.com"
  source_arn    = "${var.api_gateway_execution_arn}/*/*"
}
Deploying the project
In terraform/main.tf assign your profile name configured in the ~/.aws/credentials file.
First initialize Terrafom:
terraform init
Terraform has functionality to check the configuration before applying it. This is called a plan. Run the following command to see what Terraform will do:
terraform plan
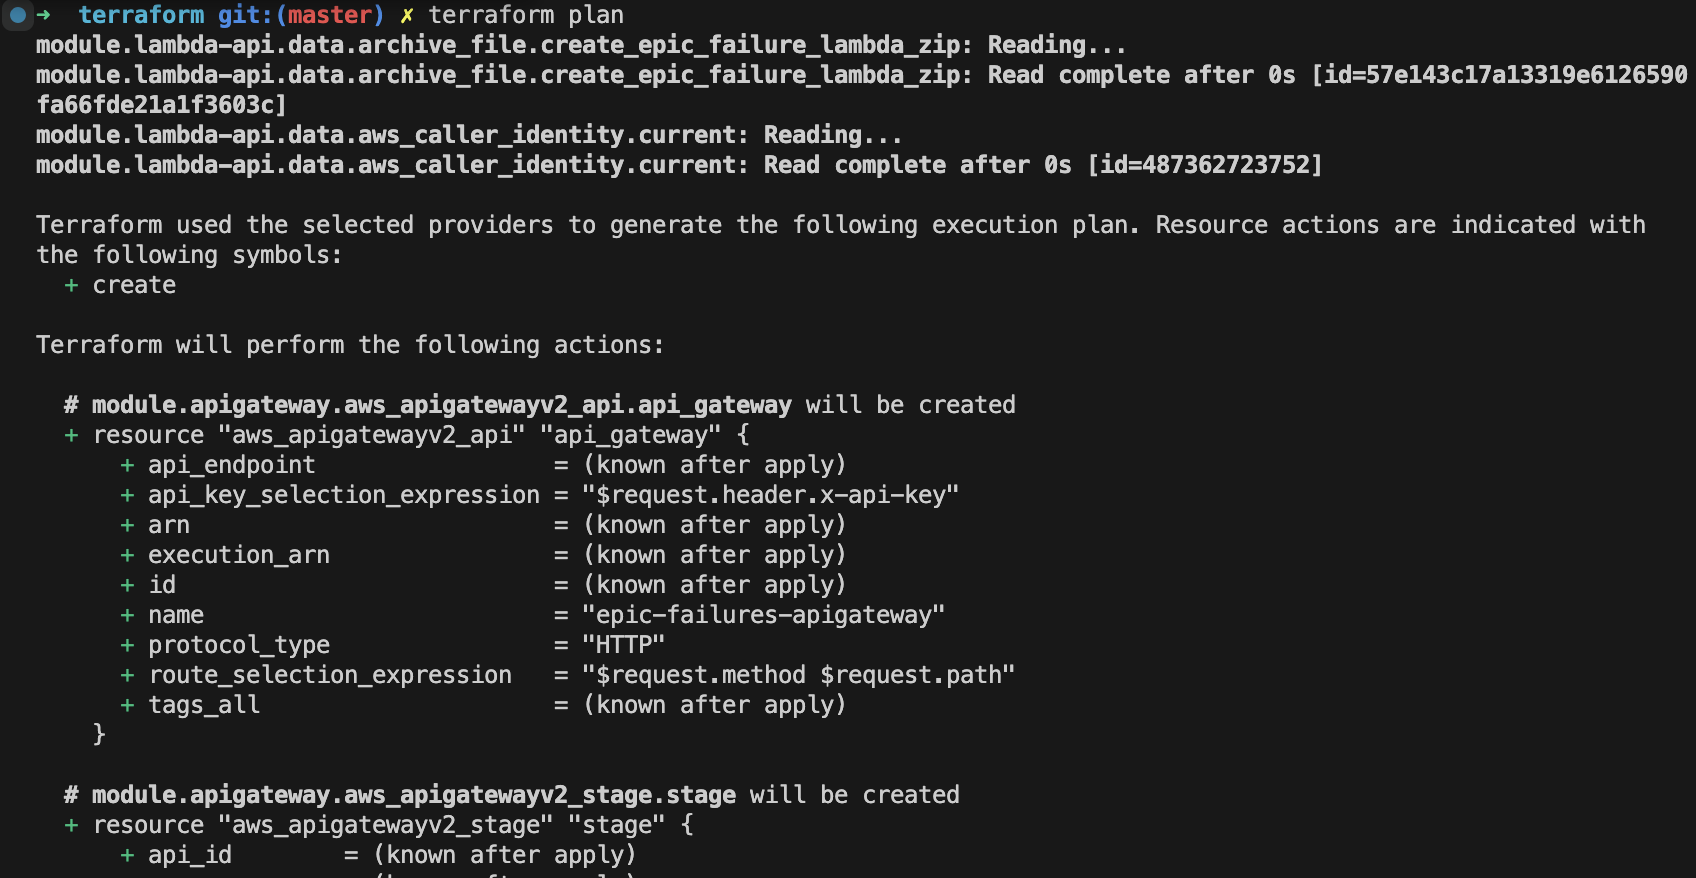
If everything looks as expected, apply the configuration:
terraform applyThis should deploy the API Gateway and Lambda function on AWS along with the necessary resources. You can access the API Gateway URL from the output of the terraform apply command.

Test the deployed API
Create an epic failure record
In the terminal export the INVOKE_URL from the terraform apply output:
export INVOKE_URL="https://<api-id>.execute-api.<region>.amazonaws.com/<stage>"
Use the curl POST request to create epic failure record:
curl -X POST \
  ${INVOKE_URL}/epic-failures \
  -H "Content-Type: application/json" \
  -d '{
    "failureID": "001",
    "taskAttempted": "deploying a feature on Friday at 4:59 p.m.",
    "whyItFailed": "triggered a cascade of unexpected errors",
    "lessonsLearned": ["never deploy on a Friday afternoon"]
  }'
That should return a response with the epic failure record created.

Browse logs in CloudWatch
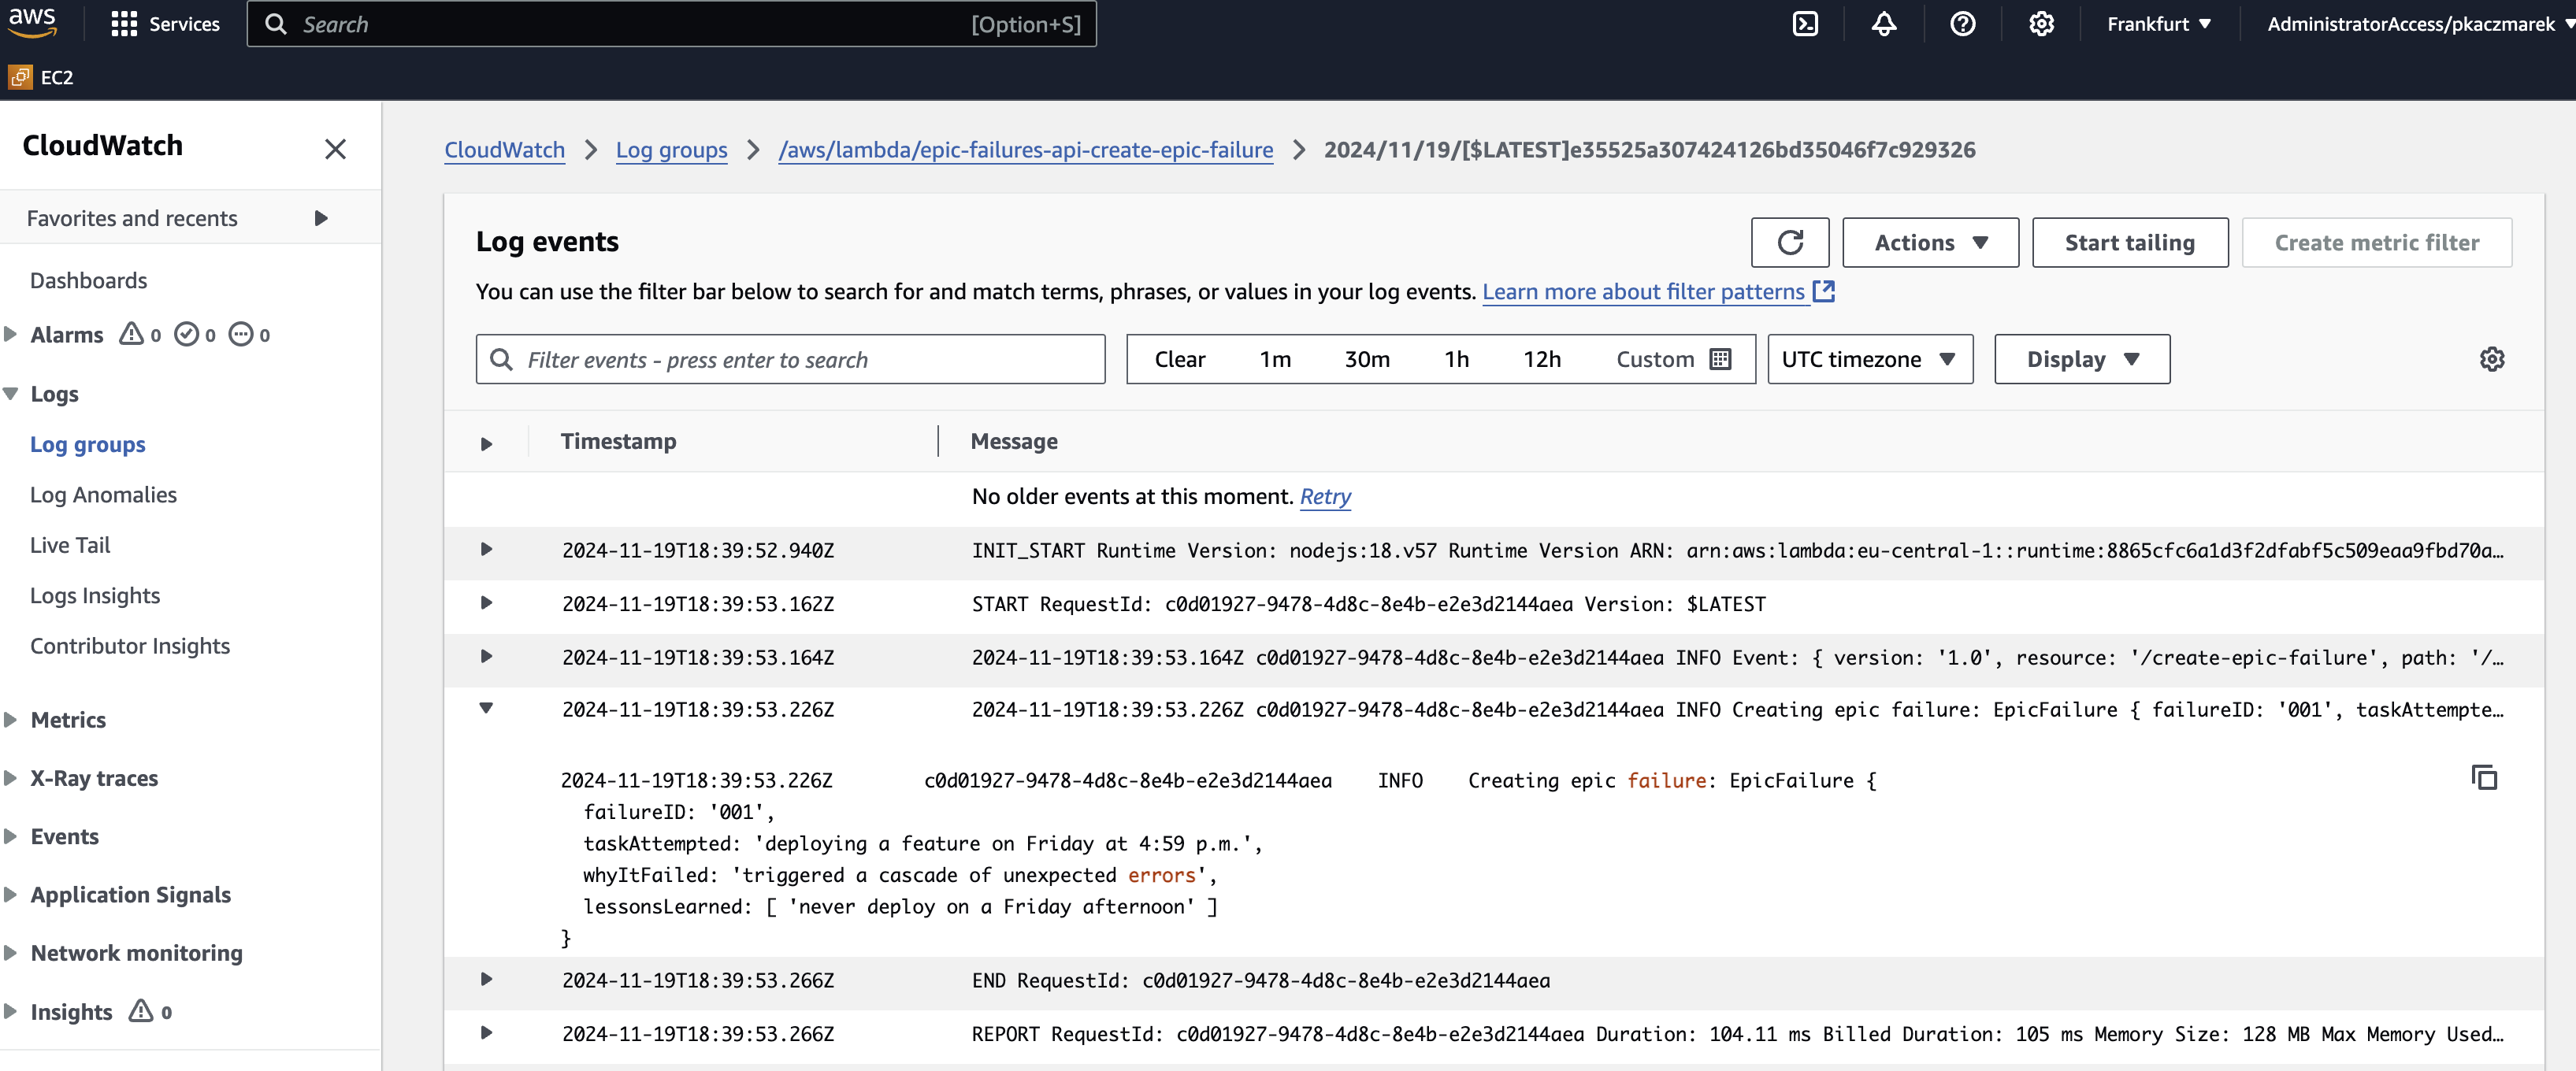
You can view the logs generated by the Lambda function in CloudWatch. Simply navigate to the CloudWatch console and look for the log group under /aws/lambda/<function-name>.
Wrapping up
Congratulations!
We have successfully deployed a simple serverless API using Terraform. In the next parts of this tutorial, we will:
- Add DynamoDB table to store the epic failure records and create remaining endpoints.
- Add AWS Cognito for authentication.
- Optimize the deployment using shared layers.
At move2edge, we’ve found that Terraform’s flexibility helps us efficiently manage both small and large deployments, no matter how complex the infrastructure requirements are.
We hope this serverless API example shows how powerful Terraform can be for building and managing infrastructure. This is just the beginning - in the upcoming parts of this tutorial series, we will dive deeper into more advanced topics and configurations. Stay tuned, and get ready to explore the full potential of Terraform in your serverless projects!



![[103] Securing Your Terraform Serverless API with Cognito](https://cdn.prod.website-files.com/67362585a7df1c57acedee7a/67600b4f8195ac0a3e9ee894_y804x.jpg)
![[102] Enhancing Your AWS Serverless API with DynamoDB for Data Persistence](https://cdn.prod.website-files.com/67362585a7df1c57acedee7a/674885347f7f6790dc367ea7_toast-on-the-floor.jpg)


